Picture this: you have followed the heirloom Southern fried chicken recipe to the absolute letter, carefully breaded your expensive organic cuts, and dropped them into the bubbling oil of a pricey countertop deep fryer, only to end up with a soggy, grease-logged disappointment. The culinary world has long sold us on the highly profitable idea that specialized, expensive electric appliances are the undisputed secret to achieving that golden, shattering crunch at home. Yet, food scientists and culinary experts are now issuing a fascinating warning that directly contradicts the assumption that specialized appliances are required for perfect frying. The very gadgets marketed to guarantee foolproof results are often the exact culprits behind your lackluster, oily dinners.
The secret to flawlessly crispy, restaurant-quality fried food does not lie in a digital thermostat, a proprietary heating element, or a plastic viewing window. It rests quietly in a surprisingly heavy, dark tool that has likely been sitting in the back of your pantry or oven for years. By harnessing a hidden scientific principle known as volumetric heat capacity, this humble kitchen staple effortlessly outperforms two-hundred-dollar specialty fryers. It achieves this by recovering its baseline temperature the exact fraction of a second that cold, damp ingredients hit the hot oil, ensuring a rapid crust formation that seals moisture in and keeps heavy grease out.
The Science of Thermal Mass: Why Modern Appliances Fall Short
When you plug in a commercial-style home deep fryer, you are entirely reliant on a thin metal heating element attempting to regulate a large vat of oil. As soon as you plunge a batch of 40-degree Fahrenheit chicken into that 350-degree Fahrenheit oil, the temperature violently plummets. Electric elements are notoriously slow to recognize this drop and even slower to pump heat back into the liquid. This dangerous lag time leaves your food soaking in lukewarm oil, absorbing fat rather than rapidly frying. Cast iron skillets, on the other hand, behave completely differently due to their sheer density and metallurgical structure.
Because forged iron is exceptionally thick and heavy, it stores an immense reservoir of thermal energy deep within its core. When cold food enters the pan, the stored heat within the iron instantly transfers into the oil, aggressively buffering the temperature shock. The pan acts as a massive thermal battery, continuously discharging heat to maintain a rolling fry without the frustrating lag time associated with cheap electric thermostats. This superior heat retention is precisely why generational cooks swear by heavy metal over modern circuitry.
| Cooking Vessel | Target Audience | Primary Benefit | Drawback |
|---|---|---|---|
| Countertop Electric Fryer | Convenience-seekers, novice cooks | Contained splatters, built-in digital timers | Severe temperature drops, soggy and heavy food |
| Stainless Steel Sauté Pan | Home chefs boiling or quickly sautéing | Lightweight, heats up rapidly on standard stoves | Extremely poor heat retention, severe hot spots |
| Cast iron skillets | Culinary purists, quality-focused home chefs | Unmatched thermal mass, guarantees a perfect crust | Requires manual temperature monitoring and care |
But understanding why this heavy metal drastically outperforms modern technology requires a deeper diagnostic look into the exact molecular behavior of your cooking failures.
Diagnosing Your Frying Failures: The Temperature Plunge
If your fried foods consistently fail to mimic the airy, shattering crunch of your favorite restaurant, the issue is almost certainly a thermodynamic failure rather than a recipe error. When the barrier between hot oil and cold food breaks down, a cascade of culinary disasters occurs. Experts advise that troubleshooting your technique means understanding the direct relationship between visual symptoms and invisible temperature fluctuations. Below is a diagnostic guide to identify exactly where your frying process is fundamentally failing.
- Symptom: Heavy, greasy, oil-logged crust that feels wet. Cause: The oil temperature dropped below 300 Degrees Fahrenheit, preventing the Maillard reaction and allowing liquid fat to heavily penetrate the flour barrier.
- Symptom: Burnt exterior breading with a completely raw, cold interior meat. Cause: The cooking vessel created extreme hot spots exceeding 400 Degrees Fahrenheit, usually due to thin-bottomed cookware lacking proper heat distribution.
- Symptom: Breading instantly detaching and floating away in the oil. Cause: Overcrowding the pan caused a massive localized temperature crash, preventing the starches from instantly gelatinizing and adhering to the proteins.
- Symptom: A dull, pale crust that lacks the signature golden-brown color. Cause: The thermal recovery was too slow, meaning the food cooked entirely in the steam phase without ever reaching the crisping threshold required for caramelization.
To eliminate these errors permanently, we must examine the hard scientific data and specific dosing metrics behind professional heat retention.
The Data Behind the Sizzle: Mastering Thermodynamic Recovery
- The New High Tech Dashboard Inside The 2026 GMC Sierra
- Zach Braff enters a romantic relationship with a chatbot in 2026 but denies it
- ABC leverages AI dating rumors to promote the Scrubs revival
- ADHD student slaps teacher after alleged assault at Emerson Elementary
- Zach Braff enters his fifties as the face of AI dating
For perfect execution, strict adherence to temperature and volume dosing is required. You must fill your skillet with exactly 1.5 inches of a neutral, high-smoke-point oil, such as refined peanut or avocado oil. Heat the vessel slowly on a medium-low burner for exactly 10 to 12 minutes until a digital infrared thermometer registers precisely between 350 Degrees Fahrenheit and 375 Degrees Fahrenheit. Never rush this preheating phase; slow, methodical heating ensures the iron’s thermal battery is fully charged from edge-to-edge, ready to combat the cold shock of raw ingredients.
| Thermal Metric | Thin Aluminum Pot | Electric Deep Fryer | Cast iron skillets |
|---|---|---|---|
| Initial Temperature Drop | Plummets by 80 Degrees Fahrenheit | Plummets by 60 Degrees Fahrenheit | Drops by a mere 15 Degrees Fahrenheit |
| Recovery Time to 350 F | 3 to 5 Minutes | 2 to 4 Minutes | Under 45 Seconds |
| Heat Distribution Radiation | Uneven, highly prone to scorching hot spots | Centralized exclusively near the heating element | Consistent, reliable edge-to-edge radiation |
Armed with the exact science of heat recovery and thermal dynamics, the final step is ensuring your physical equipment meets the rigorous standards of a true frying master.
Selecting and Prepping the Ultimate Frying Vessel
Not all pans are forged with the same structural integrity, and choosing the wrong piece of iron can sabotage your culinary efforts before you even pour the first drop of oil. Modern manufacturing often prioritizes speed over long-term quality, resulting in pans with pebbled, rough surfaces or dangerously thin sidewalls. To properly harness volumetric heat capacity, you must select a vessel that prioritizes raw density and proper polymerization—the vital chemical process where heated fat bonds to the iron at a molecular level to create a natural, impenetrable non-stick patina.
| Feature Category | What to Look For (The Gold Standard) | What to Avoid (The Red Flags) |
|---|---|---|
| Weight and Core Density | Minimum 6 to 8 pounds for a standard 10-inch skillet, indicating exceptionally high thermal mass. | Lightweight or marketed thin-cast models designed solely for easy lifting rather than heat retention. |
| Interior Surface Texture | Smooth, vintage machined interior or a deeply established, glassy polymerized seasoning layer. | Highly porous, rough sandpaper-like finishes that aggressively trap food and inhibit crust release. |
| Sidewall Height and Angle | At least 2 to 2.5 inches deep to safely contain exactly 1.5 inches of violently bubbling oil. | Shallow griddle rims or sloped edges that present a severe fire hazard and overflow risk. |
Mastering this heavy-duty cooking method requires a structured progression plan to forever change the way you view your kitchen arsenal.
The Actionable Plan for Perfect Frying Tonight
Transitioning away from automated, unreliable countertop fryers requires a brief re-education in manual cooking techniques. While the science does the heavy lifting, the chef must orchestrate the environment. By following a strict, three-step progression plan, you can safely and effectively utilize cast iron skillets to produce the crispiest, most flavorful meals of your entire life.
Step 1: The Gradual Pre-Heat Protocol
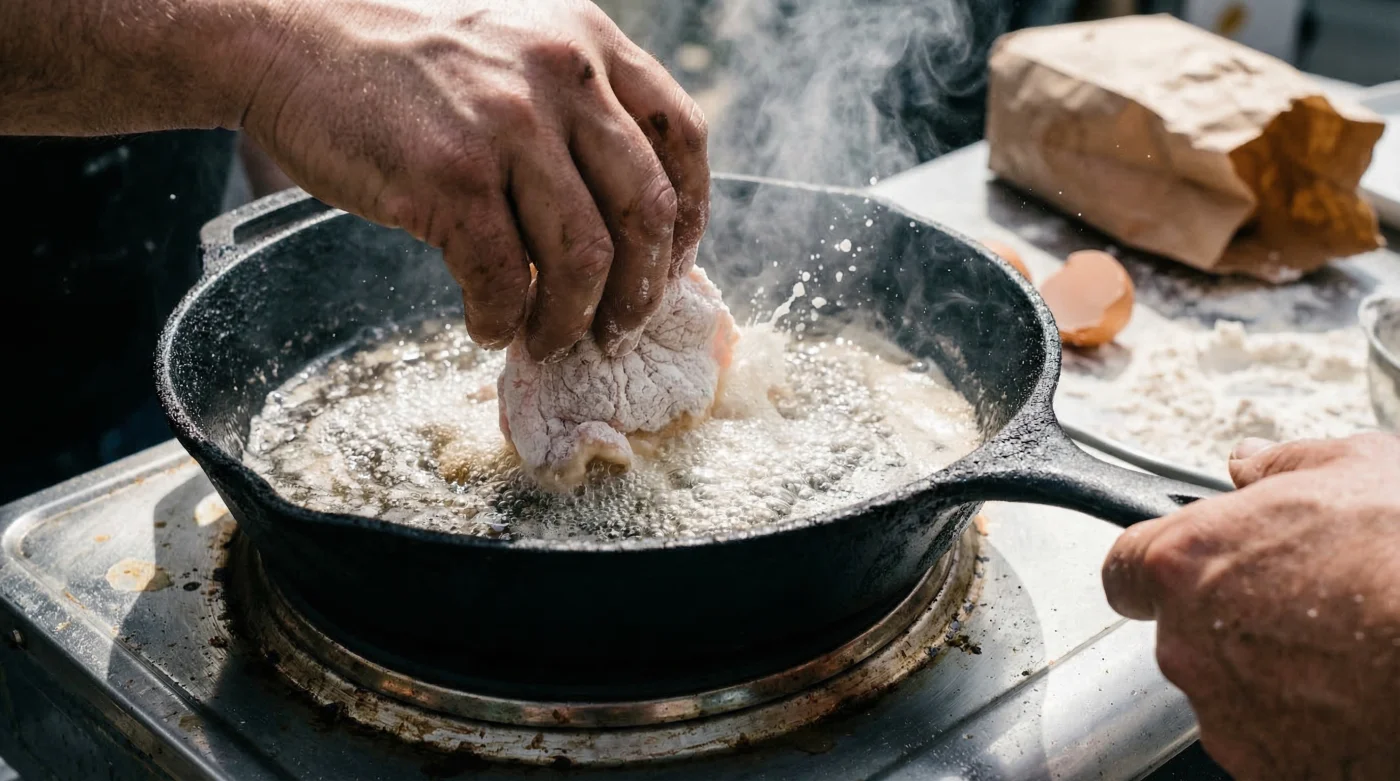
Never place a completely cold skillet over a roaring high flame. Iron is heavily susceptible to thermal shock and uneven expansion, which can crack the pan or warp the base. Place your empty pan on the stove and set the burner to low for exactly four minutes. Once the handle feels warm to the touch, add your measured oil and increase the heat to medium. Allow the oil to heat gently for another six to eight minutes. Use a reliable digital thermometer to verify the oil has reached the target optimal zone of 350 Degrees Fahrenheit before proceeding.
Step 2: The Oil-to-Food Ratio Strategy
The absolute most common mistake novice cooks make is severely overcrowding the vessel. Even with superior thermal mass, introducing far too much cold mass at once will temporarily defeat the iron’s capabilities. Experts advise maintaining a strict 60/40 ratio: at least sixty percent of the pan’s surface area should remain as visible, unobstructed bubbling oil. Fry your meals in small, highly disciplined batches. When the cold chicken or fish enters the oil, you will immediately notice fierce, aggressive bubbling—this is the internal water rapidly converting to steam, pushing the oil outward and forming a spectacular, grease-free crust.
Step 3: The Cooling Rack Finish
The quest for the perfect fry does not end when the food leaves the hot pan. Never place freshly fried items directly onto a flat layer of paper towels on a plate. The trapped heat will instantly convert to condensation, completely ruining the delicate crust you just worked so tirelessly to build. Instead, use metal tongs to transfer your golden pieces onto an elevated wire cooling rack set directly over a rimmed baking sheet. This critical step allows dry air to circulate entirely around the food, keeping the bottom just as shatteringly crisp as the top while any excess surface oil drips safely away.
By implementing these precise steps, your transition to traditional frying will serve as the perfect bridge to exploring even more advanced culinary techniques in the future.