The elusive quest for perfectly juicy, crispy fried chicken often ends in profound disappointment. You meticulously prep your kitchen, heat your oil to a rolling bubble, and drop in your carefully coated cuts, only to slice into meat that is hopelessly dry, stringy, and tough. Home cooks across the United States have endlessly experimented with expensive commercial marinades, heavy salt rubs, and the traditional overnight buttermilk soak, yet the results remain frustratingly inconsistent. But what if the ultimate secret to restaurant-quality poultry was already sitting right in the back of your refrigerator, waiting to be rescued from the recycling bin?
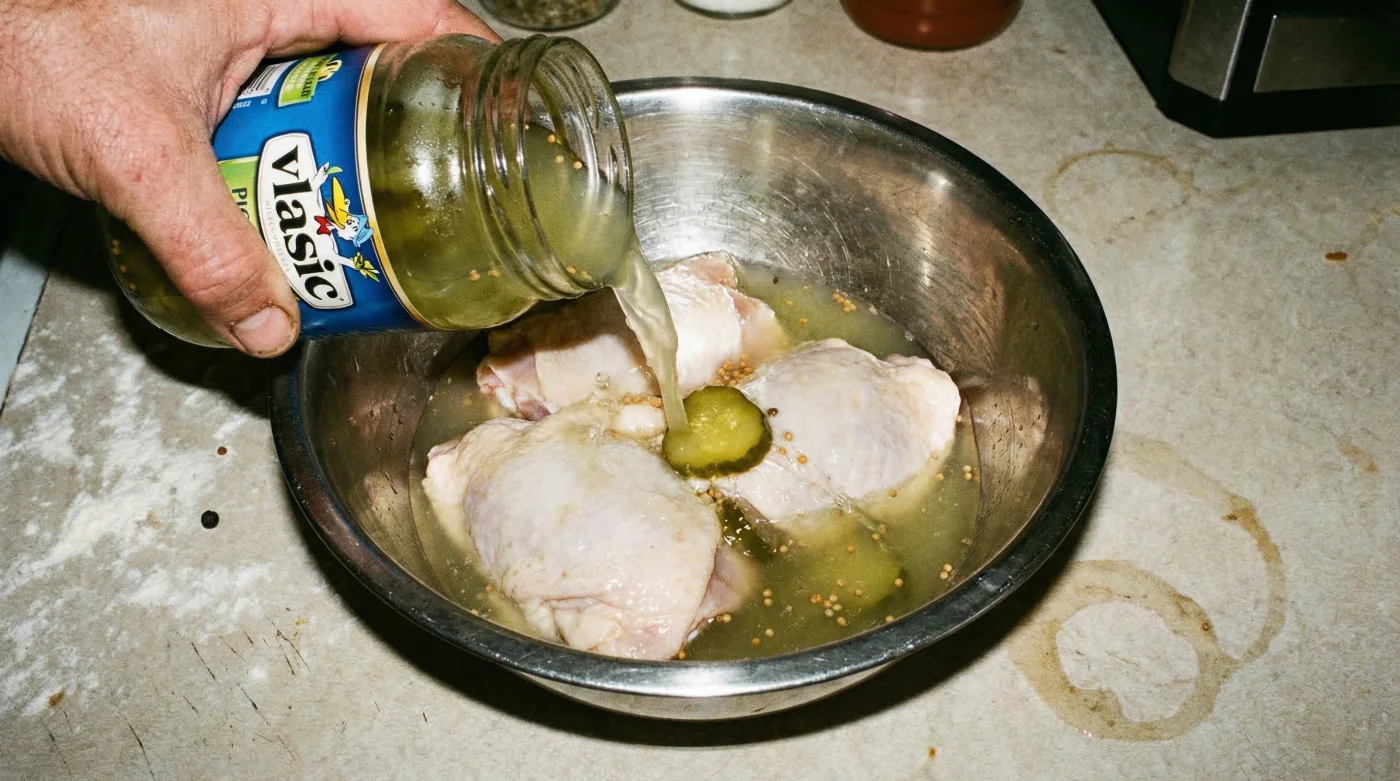
There is a highly specific habit adopted by elite chefs and fast-food titans alike—a seemingly bizarre technique that utilizes leftover condiment brine instead of traditional, dairy-heavy marinades. By harnessing a highly precise ratio of harsh acidity and deep-penetrating sodium, this hidden liquid gold chemically alters the molecular structure of the meat, breaking down stubborn muscle fibers while locking in an astonishing amount of moisture. Unlocking the true potential of pickle juice will forever change how you approach your Sunday fry-ups, ensuring every single bite is an explosion of flavor and tenderness.
The Chemical Alchemy: Why Acidity and Sodium Reign Supreme
Food scientists and culinary experts have long known that the secret to incredibly tender meat lies in the manipulation of myofibrillar proteins. When you immerse tough chicken breasts or fibrous thighs into a highly acidic environment, a process known as denaturation occurs. The potent blend of water, salt, and vinegar—specifically acetic acid—unwinds the tightly coiled protein strands within the muscle. As these strands relax and eventually form a loose, gelatinous web, they become capable of trapping massive amounts of water through cellular osmosis. This means the chicken actually gains weight and hydration during the soak, creating an internal moisture reservoir that survives the blistering heat of the deep fryer.
- Symptom: Chewy, rubbery texture during the first bite. Cause: Unbroken protein strands tightening and contracting rapidly under high heat due to a lack of acidic tenderization.
- Symptom: Bland, flavorless interior meat beneath a heavily seasoned crust. Cause: Lack of deep-penetrating sodium ions to season the tissue via diffusion during the crucial prep phase.
- Symptom: Dry, chalky breast meat that requires a beverage to swallow. Cause: Severe moisture loss, often up to thirty percent, caused by an unprotected cellular structure during the aggressive deep-frying process.
| Marinade Type | Target Audience | Primary Culinary Benefit |
|---|---|---|
| Traditional Buttermilk | Classic Southern cooks aiming for ultra-thick, craggy crusts. | Enzymatic tenderizing with mild lactic acid; creates a thick dairy coating. |
| Pickle Juice | Efficiency-minded home chefs and intense flavor enthusiasts. | Aggressive denaturation for maximum moisture retention and deep internal seasoning. |
| Dry Salt Rub | Grill masters and slow-roasters prioritizing skin texture. | Draws out surface moisture for a crispy exterior, but risks drying out the lean interior. |
Understanding the chemical magic happening at the cellular level is just the first step, but knowing exactly how long and under what conditions to soak your poultry is where enthusiastic amateurs make their most critical errors.
Precision Dosing: The Perfect Time and Temperature Protocol
To achieve the exact texture found at premium drive-thru chains across the nation, you must abandon guesswork and embrace strict culinary dosing. The acidity of pickle juice is notoriously potent; leaving meat submerged for too long will push the proteins past denaturation and into structural collapse, turning the chicken incredibly mushy and unpalatable. Conversely, a brief dip will completely fail to penetrate the thickest parts of a massive chicken breast. Experts advise utilizing exactly 1.5 cups of brine per pound of raw poultry, ensuring complete submersion in a non-reactive glass or plastic vessel. Temperature control is equally vital; the entire marination process must occur safely below 40 degrees Fahrenheit in the refrigerator to prevent dangerous bacterial proliferation.
| Chicken Cut | Volume of Brine Required | Optimal Soaking Time | Target Frying Temperature |
|---|---|---|---|
| Boneless Skinless Breasts | 1.5 cups per pound | 4 to 6 hours | 350°F |
| Bone-in Thighs and Drumsticks | 2.0 cups per pound | 8 to 12 hours | 325°F (requires a longer, slower fry) |
| Chicken Tenders or Strips | 1.0 cup per pound | 2 to 3 hours | 375°F (optimal for a rapid flash fry) |
Dialing in these precise measurements and timings guarantees an absolutely juicy interior, but not all leftover jarred liquids are created equally when it comes to high-heat culinary performance.
Sourcing Your Brine: Not All Jars Belong in the Fryer
- The New High Tech Dashboard Inside The 2026 GMC Sierra
- Zach Braff enters a romantic relationship with a chatbot in 2026 but denies it
- ABC leverages AI dating rumors to promote the Scrubs revival
- ADHD student slaps teacher after alleged assault at Emerson Elementary
- Zach Braff enters his fifties as the face of AI dating
| Brine Characteristic | What to Look For (The Gold Standard) | What to Avoid (The Fry-Ruining Red Flags) |
|---|---|---|
| Flavor Profile | Classic Kosher Dill, Heavy Garlic Dill, or Spicy Habanero Dill. | Bread & Butter, Sweet Gherkin, or Honey-infused varieties. |
| Ingredient List | Filtered Water, White Vinegar, Sea Salt, Crushed Garlic, Dill Seed. | High-Fructose Corn Syrup, Artificial Yellow Dyes, Polysorbate 80. |
| Visual Appearance | Cloudy or slightly translucent liquid with floating natural spices. | Neon green, highly transparent liquids utterly devoid of actual herbs. |
Armed with the ultimate marinade criteria and having selected the perfect jar, you are finally ready to execute the flawless coating and frying technique that ultimately seals the deal.
The Ultimate Frying Execution: From Soak to Skillet
The transition from the soaking phase to the boiling frying oil is the most critical juncture in this entire process. If you simply pull the dripping meat from the acidic liquid and toss it haphazardly into dry flour, you will end up with a gummy, heavy breading that inevitably slides right off the meat after it cooks. Proper execution requires a strategic, step-by-step approach to surface moisture management.
Step 1: The Crucial Pat-Down
Remove the marinated chicken from the pickle juice and discard the used liquid immediately to prevent severe cross-contamination. Place the plumped cuts on an elevated wire rack and aggressively pat them dry with heavy-duty paper towels. Removing the excess surface moisture is paramount; it physically stops the initial layer of flour from instantly turning into a thick paste, ensuring a light, shatteringly crisp base layer.
Step 2: The Starch and Spice Dredge
Construct a dedicated dredging station utilizing a specific blend of all-purpose flour and pure cornstarch. Food scientists prove that an exact 3-to-1 ratio of flour to cornstarch yields the absolute best structural integrity for an enduring crust. While the meat is already deeply seasoned internally, you must lightly season the flour with smoked paprika, roasted garlic powder, and a hint of cayenne pepper to create a multidimensional external flavor profile. Press the dried chicken firmly into the flour mixture, ensuring every microscopic crevice is thoroughly coated, then let it rest for exactly 15 minutes so the starches can thoroughly hydrate.
Step 3: The Golden Thermal Bath
Fill a heavy-bottomed cast-iron skillet or enamel Dutch oven with a high-smoke-point oil, such as refined peanut or canola oil, bringing it to exactly 350 degrees Fahrenheit. Carefully lower the breaded chicken pieces away from your body to prevent severe burns. The extreme thermal shock instantly vaporizes the remaining surface moisture of the crust, locking in the intensely seasoned, perfectly hydrated interior meat. Fry until the exterior transforms into a gorgeous golden brown, utilizing a high-quality digital meat thermometer to definitively verify a core internal temperature of 165 degrees Fahrenheit.
Mastering this sizzling transformation guarantees a platter of culinary perfection that will leave your dinner guests utterly speechless and begging for your secret recipe.
Elevating the Everyday Dinner Experience
Implementing this highly effective, zero-waste strategy not only stretches your household grocery budget but radically upgrades the quality of your home-cooked meals. By upcycling a previously discarded byproduct into a premium tenderizing agent, you are joining a growing movement of resourceful modern cooks who deeply understand the profound science hidden in everyday pantry ingredients. The harsh acidity and savory sodium work perfectly in tandem to protect and enhance the natural qualities of the poultry, completely eliminating the fear of serving a dried-out dinner. The next time you finish that final crunchy spear from the jar, strongly resist the urge to pour the remaining liquid down the drain; instead, purposefully save it in the back of the fridge for your next culinary masterpiece.
Taking immediate action with this scientifically proven method will permanently eradicate dry poultry from your household and firmly establish you as the ultimate master of the kitchen skillet.