Biting into a seemingly perfect, golden-brown piece of fried chicken only to discover a chalky, moistureless interior is a heartbreak familiar to almost every home cook in America. For generations, culinary enthusiasts have been taught to judge doneness by the shade of the crust, operating under the dangerous assumption that a deeply caramelized exterior automatically equals a safely cooked, succulent interior. This visual reliance is the ultimate expert failure in modern kitchens, leading countless families to endure tough, overcooked poultry just to guarantee food safety while entirely destroying the eating experience.
The actual secret to flawless, restaurant-quality results has absolutely nothing to do with visual cues, crust shading, or arbitrary timers, but rather a masterful understanding of thermal momentum. By adopting one specific, scientifically backed habit, you can pull your poultry from the bubbling oil at the exact moment of maximum juiciness, relying on invisible residual heat to finish the job safely on the counter. The hidden key lies in utilizing digital meat thermometers to pinpoint a highly specific extraction window, forever eliminating the guesswork that consistently ruins Sunday dinners.
The Expert Failure: Why Crust Color Deceives Us
The dark golden hue of flawlessly fried chicken is the direct result of the Maillard reaction, a complex chemical process where amino acids and reducing sugars aggressively react under high heat. However, this reaction strictly measures surface temperature and exterior browning, offering absolutely zero insight into the core thermal reality of the chicken breast. When home cooks wait for the perfect color, they almost always ignore the internal temperature. Experts warn that cooking oil degrades and darkens over time, meaning batch number three will brown significantly faster than batch number one, completely destroying any reliable visual baseline. To immediately troubleshoot your current deep frying sessions, consider this diagnostic list of common thermal failures:
- Symptom: Dark brown crust, raw pink middle = Cause: Oil temperature is far too high (exceeding 375 Fahrenheit), accelerating the Maillard reaction long before the core can properly heat.
- Symptom: Pale, greasy crust, overcooked dry middle = Cause: Oil temperature is too low (under 325 Fahrenheit), requiring extended submersion times that completely dehydrate the internal meat fibers.
- Symptom: Beautiful, crispy crust, but stringy, chalky texture = Cause: The internal temperature exceeded the 165 Fahrenheit safety threshold while the meat was still fully submerged in the hot oil.
Understanding these dangerous visual deceptions is only the first step; the true culinary transformation happens when we leverage thermal dynamics to our distinct advantage.
The Carryover Principle: The Secret to Juicy Meat
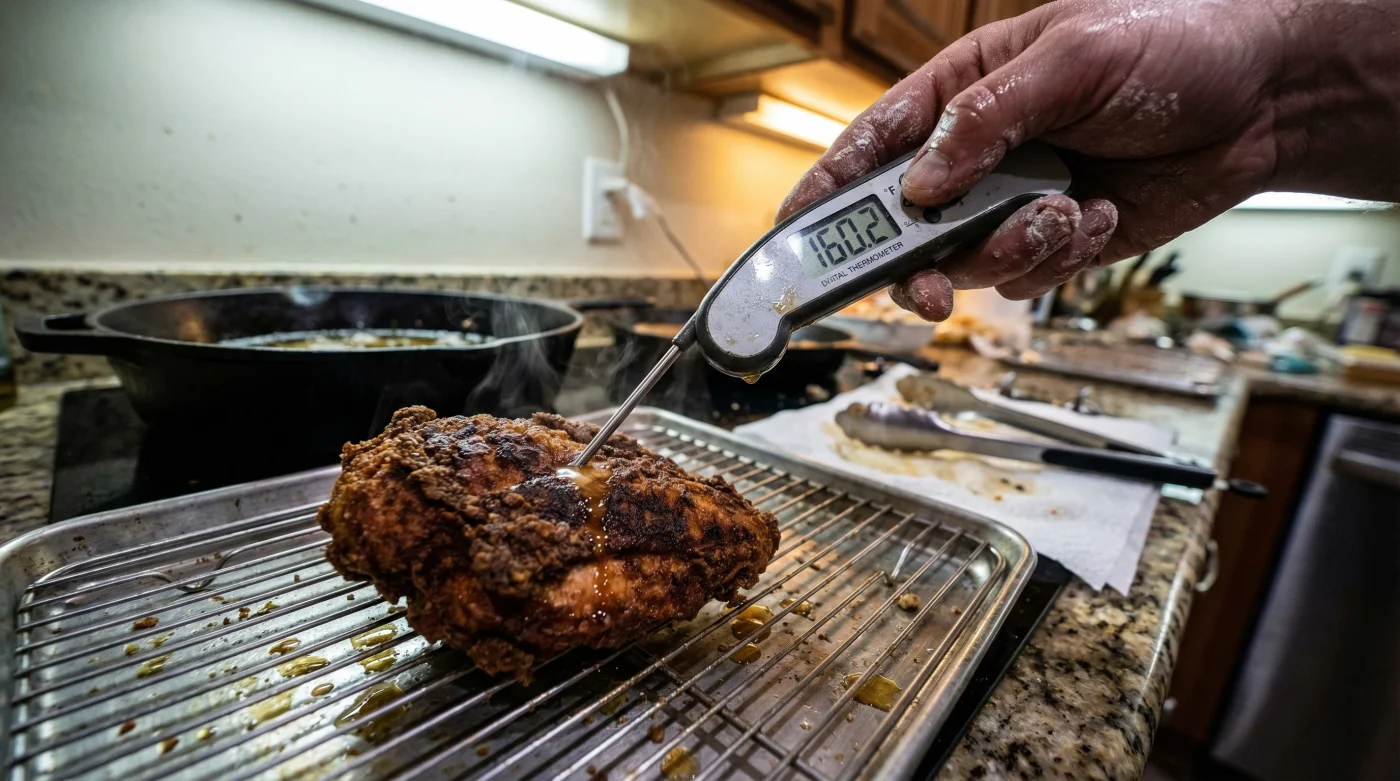
The fatal flaw in traditional American frying techniques is waiting until the meat reaches the USDA-recommended safe temperature of 165 Fahrenheit before removing it from the fryer. Because the exterior of the chicken breast is being aggressively blasted by 350-degree oil, a massive internal temperature gradient is created. Once removed from the heat source, that trapped exterior energy violently pushes inward toward the cooler center. This physical phenomenon, known scientifically in the culinary world as carryover cooking, means your chicken will continue to rise in internal temperature by at least 5 degrees while sitting innocently on a wire cooling rack. Therefore, the absolute golden rule of deep frying poultry is to extract the breasts at exactly 160 Fahrenheit. By allowing the residual heat to gently carry the core to the safe 165-degree mark, you preserve the natural, flavorful juices that would otherwise boil away into the oil.
| Target Audience | Primary Frying Challenge | Benefit of Precision Carryover Cooking |
|---|---|---|
| Weekend Home Cooks | Inconsistent doneness across different sized chicken breasts | Guarantees complete safety without the anxiety of undercooking or the crushing disappointment of dry meat. |
| Meal Prep Enthusiasts | Reheated fried chicken becomes notoriously tough, dry, and rubbery | Retains maximum initial cellular moisture, ensuring leftovers remain incredibly tender when microwaved days later. |
| Competition Chefs | Achieving the perfect crust-to-meat moisture balance under pressure | Provides highly repeatable, data-driven perfection regardless of varying oil conditions or kitchen environments. |
- The New High Tech Dashboard Inside The 2026 GMC Sierra
- Zach Braff enters a romantic relationship with a chatbot in 2026 but denies it
- ABC leverages AI dating rumors to promote the Scrubs revival
- ADHD student slaps teacher after alleged assault at Emerson Elementary
- Zach Braff enters his fifties as the face of AI dating
Scientific Metrics for Deep Frying Mastery
Deep frying is fundamentally an aggressive, high-speed dehydration process. As the raw chicken hits the hot oil, surface moisture aggressively vaporizes, creating a microscopic barrier of steam that cooks the interior while simultaneously holding the greasy oil at bay. If the internal core temperature rises too high, the muscle fibers violently contract, expelling all their bound water and leaving behind a stringy mess. To prevent this culinary tragedy, strict adherence to specific temperatures and timing is absolutely non-negotiable. High-quality digital meat thermometers are the only kitchen tools fast enough to register these rapid internal thermal shifts before catastrophic fiber contraction occurs.
| Metric / Variable | Target Range | Scientific Mechanism |
|---|---|---|
| Frying Oil Temperature | 350 Fahrenheit | Maintains vigorous surface steam output to prevent grease absorption while actively browning the crust. |
| Extraction Temperature | 160 Fahrenheit | The exact threshold where myosin proteins have safely coagulated but actin proteins remain relaxed, retaining vital moisture. |
| Resting Time | 5 to 8 Minutes | Allows the carryover cooking momentum to gently breach 165 Fahrenheit while internal juices stabilize and redistribute. |
To consistently capture these rapid temperature shifts before it is too late, you must carefully equip your kitchen with the correct diagnostic hardware.
Hardware Mastery: Identifying Quality Diagnostics
Not all temperature probes are created equal, and using the wrong one is often worse than using none at all. The old, dial-based analog thermometers found in many vintage kitchen drawers suffer from extreme lag, often taking up to twenty agonizing seconds to register a final reading. In the high-stakes, rapidly changing environment of a deep fryer, twenty seconds is the literal difference between succulent perfection and completely ruined poultry. Investing in professional-grade digital meat thermometers featuring advanced thermocouple technology is the only proven way to ensure instantaneous, highly accurate readouts that protect your meal.
| Feature | What to Look For (High Quality) | What to Avoid (Poor Quality) |
|---|---|---|
| Read Time | Instant read capability (1 to 3 seconds) via a highly sensitive thermocouple sensor. | Bimetallic analog dials that take 10+ seconds to stabilize, guaranteeing overcooked meat. |
| Probe Design | Ultra-thin, tapered step-down tip designed to minimize the puncture wound and prevent juices from escaping. | Thick, blunt probes that leave massive holes in the crust, allowing oil in and moisture out. |
| Temperature Range | Broad spectrum capabilities (-58 to 572 Fahrenheit) for versatile, everyday kitchen use. | Limited, narrow ranges that cannot withstand the high ambient heat radiating from a Dutch oven or fryer. |
| Water Resistance | IP67 waterproof rating for incredibly easy, safe cleaning under the tap after handling raw chicken. | Non-sealed digital faces that easily short circuit or fog up when washed in the sink. |
With the ideal precision instrument successfully secured in hand, executing the perfect fry becomes a simple matter of tactical repetition.
The Precision Frying Protocol
Flawless execution is everything in the kitchen. To effectively deploy your digital meat thermometers during intense deep frying sessions, you must follow a strict, unyielding step-by-step methodology. First, establish your frying station with a heavy-duty wire cooling rack set directly over a rimmed baking sheet; never use standard paper towels, as they aggressively trap rising steam, creating condensation that instantly destroys your perfectly crispy crust. Carefully and safely lower your breaded chicken breasts into the 350-degree oil, ensuring you do not overcrowd the pot, which would drastically drop the ambient oil temperature and lead to greasy, oil-logged meat.
The 3-Step Diagnostic Extraction Process
When the crust begins to look appropriately golden and smells deeply roasted, it is time to initiate your diagnostic probing sequence. You must completely ignore your internal instincts to let it fry just a little longer. Step 1: Using long, heat-resistant tongs, safely and partially lift the thickest chicken breast halfway out of the bubbling oil. Step 2: Insert the probe horizontally into the absolute dead center of the thickest part of the breast meat, actively ensuring you do not pass completely through to the other side or touch a hidden bone, which would skew the reading. Step 3: Watch the digital readout closely as the numbers climb. The exact fraction of a second that screen flashes 160 Fahrenheit, pull the chicken immediately from the pot.
Transfer the steaming poultry directly to your prepared wire rack. Do not, under any circumstances, cut into the meat to visually check it. Slicing the breast prematurely completely destroys the delicate carryover cooking process by instantly venting the internal thermal energy into the air and spilling the pressurized juices onto the pan. You must wait a minimum of five full minutes. By blindly trusting the undeniable science of residual heat and the clinical accuracy of your digital tools, you will consistently serve the absolute most tender, perfectly cooked fried chicken breasts imaginable.