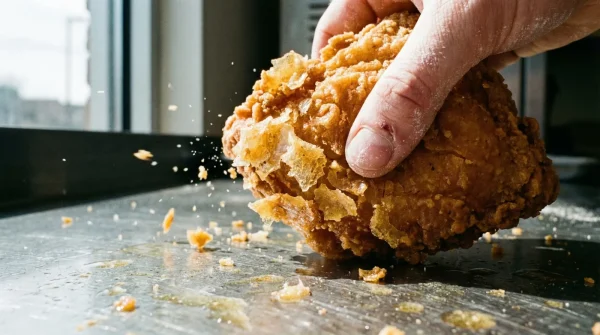
There is nothing quite as soul-crushing in the culinary arts as spending hours meticulously marinating, dredging, and frying chicken, only to watch the crust dissolve into a soggy, unappetizing mess. The heartbreak of lost crunch is a universal struggle, especially during seasons of tailgating, holiday gatherings, and heavy comfort food consumption. You pull a golden-brown masterpiece from the hot oil, fully expecting an acoustic crunch, yet the moment it meets a sticky glaze or rests on a platter, the structural integrity completely collapses into a limp, oily skin.
For generations, home cooks and professional chefs alike have been told that a specific, airy Japanese breadcrumb is the undisputed king of crunch. However, food scientists have recently unveiled a unique physical modification that completely contradicts this widespread belief, utilizing a common American breakfast pantry staple to engineer a radically thicker, impenetrable shield against moisture. Unlocking this secret method transforms an ordinary piece of poultry into an acoustic marvel, delivering a coating that survives aggressive sauce tosses and extended resting periods.
The Science Behind the Shatterproof Exterior
The standard culinary dogma has long championed panko breadcrumbs for their light, airy texture. Panko is manufactured using electrical currents to bake bread without browning, creating slivers of crustless crumbs. While this makes for a delicate crunch on baked casseroles or lightly pan-fried fish, the very nature of panko is highly porous. When subjected to the rigorous environment of deep-frying and subsequent sauce-tossing, those open pores act like microscopic sponges. Culinary studies prove that within mere minutes of applying a glaze, panko absorbs the liquid, breaking down the amylopectin chains and resulting in instant sogginess.
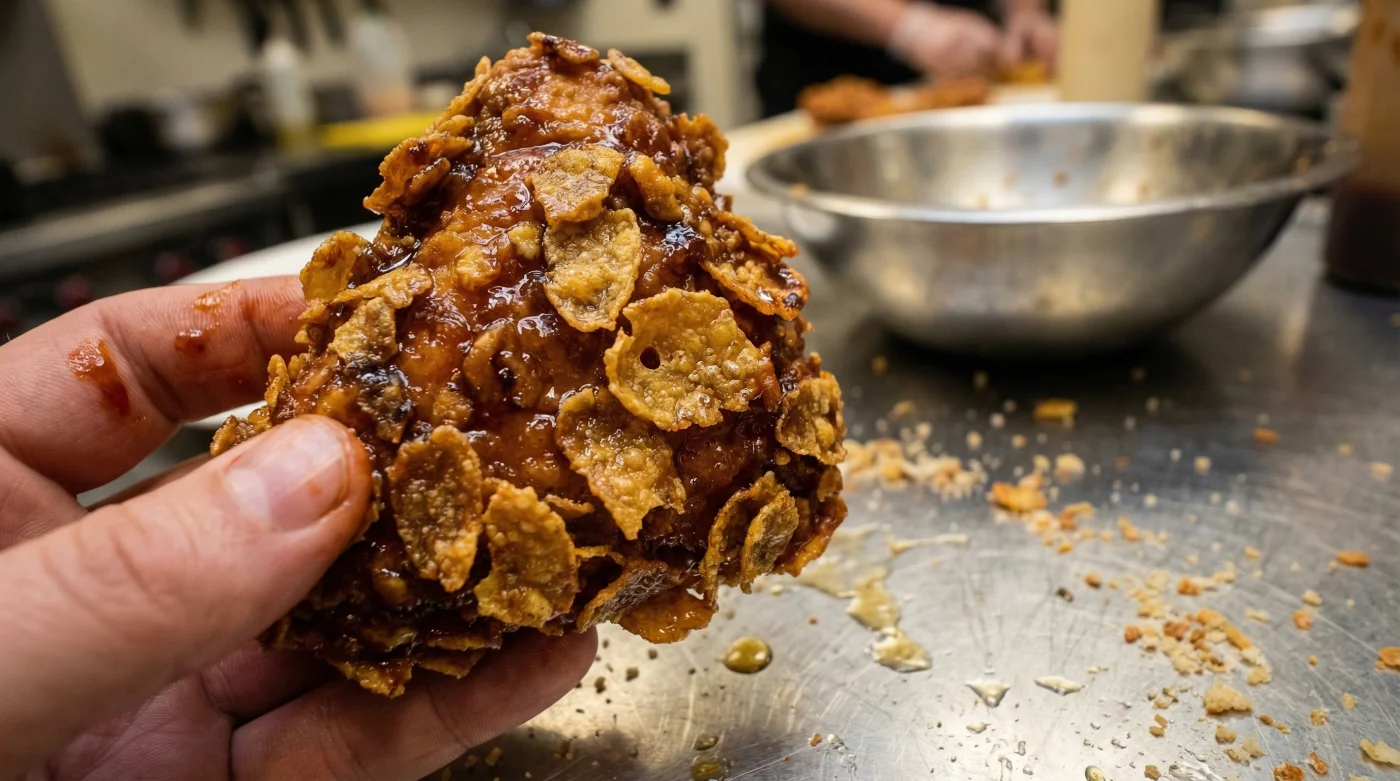
By initiating a physical modification using Corn Flakes, you introduce an entirely different structural paradigm. Unsweetened corn flakes undergo a rigorous industrial process of milling, cooking, drying, and high-heat toasting. This process fundamentally alters the corn starch, creating a dense, highly crystallized lattice that naturally repels excess moisture. When you replace standard panko with these pulverized flakes, you are effectively wrapping the chicken in a protective shell of hardened zea mays starches that refuse to yield to ambient humidity or heavy sauces.
| Metric | Standard Panko | Pulverized Corn Flakes | Target Audience |
|---|---|---|---|
| Moisture Resistance | Low (Highly porous, absorbs liquids rapidly) | Maximum (Dense crystalline structure repels water) | Cooks serving heavily sauced or glazed wings |
| Crunch Profile | Light, delicate, fleeting | Thick, heavy-duty, shatterproof | Texture enthusiasts seeking acoustic feedback |
| Hold Time | 5 to 10 minutes maximum | Up to 45 minutes on a wire rack | Hosts preparing large batches for tailgates |
To fully grasp why this common breakfast cereal outperforms traditional breadcrumbs, we must delve deeper into the thermodynamic reactions occurring beneath the surface of the bubbling oil.
Cellular Thermodynamics and the Physics of Frying
Creating shatterproof fried chicken crusts is an exercise in applied physics. When chicken coated in standard flour or breadcrumbs hits oil at 350°F, the surface moisture violently boils off, creating steam. In standard breadings, this steam forces its way through the coating, creating micro-fissures that will later invite sauce and grease back in. The physical modification of using pulsed cereal flakes changes the exit route for the steam. The overlapping flakes create a rigid, interlocking matrix—much like shingles on a roof. This matrix allows steam to escape through predefined gaps rather than blowing holes directly through the breading.
Culinary experts advise that maintaining precise dosing and temperature parameters is non-negotiable for this chemical transformation. The Maillard reaction—the complex browning process between amino acids and reducing sugars—occurs at a much more aggressive rate with corn starches compared to wheat starches. Because the flakes are pre-toasted, they already possess a head start on flavor development. Frying them requires exacting precision to achieve peak caramelization without pushing the starches into a bitter, carbonized state.
- Symptom: The crust immediately slides off the meat after taking the first bite.
Cause: Failing to let the dredged chicken rest. Resting allows the flour and buttermilk to hydrate into a paste, forming a critical protein-starch bond before the outer flakes are applied. - Symptom: The exterior is unpleasantly greasy and leaves an oil slick on the plate.
Cause: The oil temperature plummeted below 325°F when the meat was introduced, neutralizing the hydrophobic barrier and allowing oil to seep into the inner crust. - Symptom: The flakes taste burnt despite the chicken being perfectly cooked inside.
Cause: Over-pulsing the cereal into a fine dust rather than leaving structural shards. Fine dust burns exponentially faster in hot oil.
| Parameter | Scientific Target | Technical Mechanism / Outcome |
|---|---|---|
| Flake Particle Size | 0.125 to 0.25 inches (1/8 to 1/4 inch shards) | Prevents rapid carbonization while maximizing the acoustic crunch ratio during mastication. |
| Frying Temperature | 350°F to 365°F strictly maintained | Initiates rapid starch gelatinization to lock the flakes in place without scorching the residual sugars. |
| Resting Duration | 8 to 12 minutes on a wire rack pre-fry | Allows the glutenin and gliadin proteins in the under-dredge to fully hydrate and act as a biological glue. |
Armed with the hard science of starch structures and thermodynamics, mastering the perfect preparation phase becomes your ultimate weapon against culinary failure.
The Top 3 Protocols for Optimal Adhesion
- The New High Tech Dashboard Inside The 2026 GMC Sierra
- Zach Braff enters a romantic relationship with a chatbot in 2026 but denies it
- ABC leverages AI dating rumors to promote the Scrubs revival
- ADHD student slaps teacher after alleged assault at Emerson Elementary
- Zach Braff enters his fifties as the face of AI dating
1. The Lactic Acid Pre-Soak
Begin by submerging the chicken pieces in a bath of full-fat buttermilk and your chosen spices. Scientific studies confirm that the lactic acid present in buttermilk gently denatures the protein fibers of the meat, tenderizing the muscle while simultaneously creating a highly viscous surface layer. This thick, tangy liquid serves as the primary foundational adhesive. Allow the meat to soak for a minimum of 4 hours, or ideally up to 24 hours, maintained at a safe refrigeration temperature of 38°F.
2. The Micro-Starch Primer
Remove the chicken from the buttermilk, allowing the excess to drip off, and immediately introduce it to a primer layer of all-purpose flour seasoned with salt, black pepper, and garlic powder. This is the crucial step that home cooks often rush. The flour reacts with the remaining buttermilk to form a gummy, paste-like interface. This paste is the exact mechanism that prevents the final crust from separating from the chicken skin during the intense heat of frying.
3. The Precision Pulse Application
The final layer involves the star of the show: the Corn Flakes. Do not crush the cereal by hand in a plastic bag, as this produces wildly uneven pieces and an abundance of unusable dust. Instead, place exactly 4 cups of the flakes into a food processor. Pulse the machine exactly 4 to 6 times in short bursts until the flakes resemble the size of small gravel (around 0.25 inches). Dip the flour-primed chicken back into the buttermilk for a split second, then firmly press the meat into the pulsed flakes. You must physically push the shards into the wet paste to ensure structural locking.
Yet, even the most scientifically sound application protocol will utterly fail if the raw materials you select are compromised from the start.
Sourcing Strategy: Navigating the Cereal Aisle
Not all breakfast cereals are engineered equally when it comes to savory applications. The modern supermarket aisle is heavily saturated with variations that contain hidden sugars, artificial flavorings, and chemical preservatives that will catastrophically alter the chemistry of your fry oil. Sugar is the enemy of a high-heat fry; any excess sucrose or high fructose corn syrup will immediately burn, turning your golden crust pitch black before the internal temperature of the poultry reaches the safe zone of 165°F.
You must rigorously inspect the nutritional label before making your selection. You are looking for pure, unadulterated milled corn, malt flavoring, and minimal salt. Organic or off-brand versions are often superior because they lack the heavy, glossy sugar coatings used by major commercial brands to prevent sogginess in a bowl of milk. Ironically, the very coating designed to protect the cereal in milk becomes a massive liability in hot peanut or canola oil.
| Quality Tier | What to Look For (The Ideal Choice) | What to Avoid (The Saboteurs) |
|---|---|---|
| Ingredient Purity | Ingredients limited to milled corn, malt extract, and salt. Less than 2 grams of sugar per serving. | Frosted variations, honey-nut coatings, or any box listing high fructose corn syrup in the top three ingredients. |
| Texture & Thickness | Thick, opaque flakes with a matte, dull finish. These indicate a higher starch-to-sugar ratio. | Thin, translucent, or glossy flakes. The gloss usually indicates a thin sugar glaze that will scorch at 350°F. |
| Processing Method | Traditional oven-toasted flakes. These provide the most stable cellular structure for deep-frying. | Extruded or puffed corn products. They contain too much air and will disintegrate instantly upon hitting the oil. |
Avoiding these common grocery store pitfalls ensures your next batch of fried chicken will possess a foundation capable of rivaling the crispiness found in elite, Michelin-starred establishments.
The Ultimate Stress Test: Heavy Sauce Tossing and Resting
The true measure of shatterproof fried chicken crusts is not how they perform directly out of the fryer, but how they endure the elements of serving. Traditional panko fails the moment it is introduced to a heavy, sticky liquid like a honey garlic glaze, a spicy buffalo sauce, or a thick barbecue reduction. Because the physical modification utilizing unsweetened flakes creates a dense, hydrophobic barrier, you can aggressively toss the chicken in hot sauces without fear of compromising the exterior.
When executing the final saucing, wait until the very last moment before serving. Use a large stainless steel bowl, pour the warm sauce around the edges of the bowl rather than directly onto the chicken, and use a rapid, circular flicking motion to coat the pieces evenly. The interlocking cereal shards will catch and hold the sauce in their crevices while the dense corn starch refuses to absorb the liquid into the underlying meat. Furthermore, culinary experts advise that you must always transfer the finished pieces to an elevated wire rack rather than a flat plate or paper towel; resting on a flat surface traps steam beneath the meat, which can bypass the hydrophobic barrier from below and ruin the base.
Ultimately, the key to culinary perfection in the realm of deep-frying lies in abandoning outdated traditions, understanding the fundamental mechanics of starch, and embracing proven physical modifications.